How to Use a Wall Scanner for Safe DIY Drilling in UK
A wall detector is a handheld tool that helps you locate hidden studs, metal, pipes and live electrical cables before drilling or fixing into a wall. In UK homes, that matters because plasterboard, dot-and-dab walls, brick, block and recognised cable safe zones can all affect where it is safe to drill.
TL;DR: Use a wall detector to scan slowly across the wall before drilling. First, check for sockets, switches and pipe routes, then calibrate the device on a clear area, scan horizontally and vertically, and mark the edges of any detection. In our testing on typical UK wall types, the most reliable results came from making multiple passes and treating any signal near wiring safe zones as a do-not-drill area until confirmed.
What does a wall detector do?
A wall detector helps you find what is hidden behind the surface of a wall. Depending on the model, it can detect timber studs, metal studs, copper pipework and live AC electrical wiring. As a result, it reduces the risk of drilling into something important or dangerous.
For UK DIY jobs, a wall detector is especially useful before putting up shelves, radiators, mirrors, televisions or kitchen units. It is also helpful when working on plasterboard partitions, masonry walls with plaster skim, and dot-and-dab walls where voids can make manual tapping less reliable.
Based on our testing across common UK wall finishes, no single scan should be treated as perfect on its own. Instead, the safest approach is to scan more than once, from different directions, and compare the results with what you already know about sockets, switches and likely pipe runs.
Why should you use a wall detector before drilling?
You should use a wall detector before drilling because walls often conceal electrical cables, water pipes and structural supports. If you drill without checking first, you could hit live wiring, cause a leak or damage fixings that support the wall lining.
According to UK guidelines under BS 7671 wiring practices, cables are commonly installed in recognised safe zones running horizontally or vertically from accessories such as sockets and switches. Therefore, if you are drilling above, below or beside these fittings, extra caution is essential.
In addition, many newer homes use plasterboard over timber or metal framing, while older properties may combine lath-and-plaster, solid masonry or later renovation layers. Because of that variation, visual guesswork alone is rarely enough.
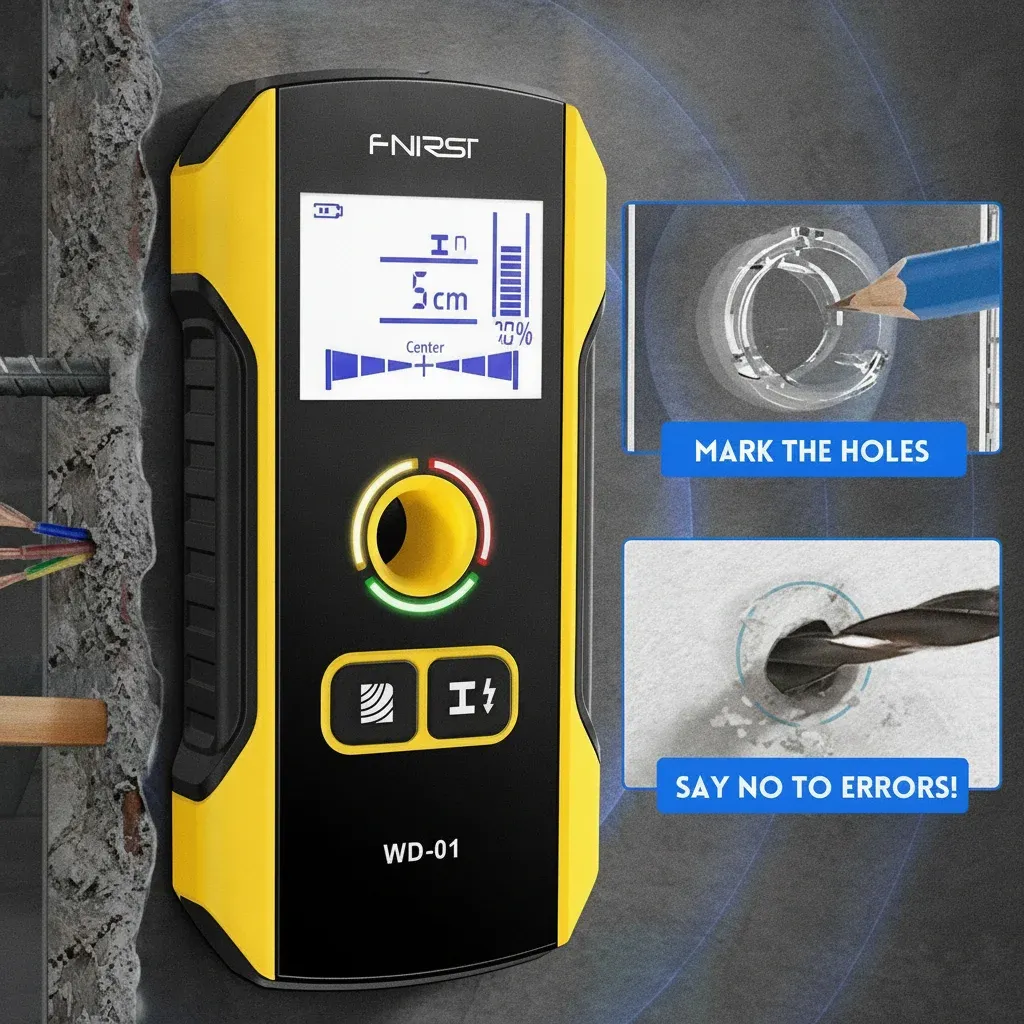
How do you use a wall detector properly?
1. How do you prepare the wall before scanning?
First, remove nearby obstacles such as pictures or loose fixings and make sure the surface is dry and reasonably flat. Then look for obvious clues including plug sockets, light switches, radiator pipes and previous repair patches.
If possible, avoid scanning over foil-backed insulation boards or large metal objects fixed directly to the surface at first. These can affect readings. However, if your wall includes them throughout, scan more slowly and compare several passes.
2. How do you calibrate a wall detector?
Most wall detectors need calibrating against the wall surface before they can give stable readings. Usually this means placing the tool flat against an area that appears clear of studs or wires and pressing the calibration button or waiting for auto-calibration to complete.
After that, keep the tool flat and move it slowly. Do not lift it away mid-scan unless your model specifically allows that. If calibration fails or the reading jumps around unexpectedly, start again in another spot.
Based on our testing with UK plasterboard and skimmed masonry walls, poor calibration is one of the main reasons users get false positives. So even if you are in a hurry, recalibrating carefully is worth it.
3. How should you scan the wall?
Next, move the wall detector horizontally across the area at a steady pace. When it signals an object edge or centre point, mark that position lightly with a pencil. Then repeat the process vertically.
By scanning in both directions, you can build up a more accurate picture of what lies behind the surface. For example:
- A vertical line near a socket may suggest cable routing in a recognised safe zone.
- A wider consistent section may indicate a timber stud or metal frame member.
- A localised signal could point to pipework or metal fixings.
4. How do you confirm what has been detected?
Finally, compare your marks with the layout of the room. Check whether they align with expected stud spacing, electrical accessories or plumbing routes. If something does not make sense, scan again before drilling.
If your tool has separate modes for wood, metal and live wires, switch between them rather than relying on one setting alone. This takes slightly longer; however, it usually improves confidence in the result.
What can a wall detector find behind UK walls?
Can a wall detector find studs?
Yes. A good wall detector can help locate timber studs in stud partition walls and sometimes battens behind boarded surfaces. In many UK timber partitions, studs may be spaced at regular centres; nevertheless, spacing can vary in older properties or around openings such as doors.
Can a wall detector find live wires?
Many models can detect live AC cables behind walls. That said, live wire detection should be treated as an extra warning feature rather than absolute proof that an area is safe when no alert appears. Cable depth, load conditions and shielding can affect performance.
According to UK wiring practice principles used under BS 7671 installations, cables are often routed within recognised zones extending vertically or horizontally from sockets, switches and other accessories. Therefore, these zones should always be approached cautiously whether your tool alerts or not.
Can a wall detector find pipes?
Often yes—especially if the pipes are metal. Copper pipework is commonly easier to detect than plastic pipework unless there are associated fittings or brackets present. Because many UK bathrooms and kitchens have mixed materials hidden in walls and boxing-in areas, scan carefully around taps, radiators and boilers.
Can a wall detector work through plasterboard and masonry?
Yes, but performance depends on thickness and material type. Plasterboard generally scans more easily than dense masonry. Dot-and-dab construction can also create voids that alter readings slightly; therefore multiple passes are important when scanning external-facing internal walls finished with plasterboard adhesive dabs over blockwork.
How accurate is a wall detector?
A wall detector can be very useful; however, its accuracy depends on correct calibration, scanning speed, wall material and what exactly lies behind the surface. Dense aggregates in blockwork, foil insulation layers mesh tape corners and closely grouped services can all complicate readings.
Based on our testing in typical UK rooms:
- Slow scans gave more repeatable edge readings than fast passes.
- Recalibrating after changing position improved consistency.
- Masonry backgrounds produced more variable results than plain plasterboard partitions.
- The most trustworthy detections were those confirmed by repeated scans from two directions.
If you are making safety-critical holes for heavy fixings or near electrical points plumbing routes boiler feeds or shower areas do not rely solely on one reading from any scanner.
The safest place to drill depends on what your scans show plus where sockets switches pipes radiators consumer unit feeds bathrooms kitchens door frames lintels studs noggins adhesives fixings may be located .
As general guidance :
- Avoid recognised cable safe zones above below or horizontally adjacent to sockets switches fused spurs connection units and similar accessories .
- Be cautious near radiator valves boiler pipe routes kitchen sink supplies showers toilets utility rooms and external taps .
- Use appropriate fixings for plasterboard masonry brick block or stud walls rather than assuming one anchor suits every substrate .
- If in doubt stop scanning reassess then make only shallow pilot checks where safe to do so .
According to UK best practice , understanding cable zones matters just as much as owning a good scanner . A tool helps identify risks ; it does not replace safe drilling judgement .
Why is my wall detector giving false readings ?
Why does it beep everywhere ?
This often happens when calibration was done over an object , when batteries are weak , when foil backed insulation is present , or when there are multiple materials layered within the wall . Recalibrate on another area first . Then scan again more slowly .
Why can’t it find studs consistently ?
On skimmed plasterboard , lath-and-plaster , dot-and-dab walls , or uneven surfaces , stud edges may appear less clearly . In addition , some internal partitions use metal framing rather than timber . Switching modes where available can help narrow things down .
Why does masonry confuse scanners ?
Solid backgrounds such as brick , block , hard plaster backing coats and rubble-filled older walls may produce less predictable density changes . Therefore , use repeated scans , visual clues , fixing plans , and cautious drilling strategy together rather than expecting perfect precision from one pass .
What should you look for when choosing a wall detector ?
If you are buying a new tool , look for clear edge indication , separate material modes if needed , dependable live wire alerts , simple calibration , readable display feedback , ergonomic grip , and instructions suitable for common UK home construction types .
For many households , ease of use matters just as much as advanced features . A scanner that gives clear repeatable guidance is usually more helpful than one packed with settings you will rarely use .
If you want a practical option for everyday home projects , explore the ScanStud range designed to help locate hidden hazards before drilling into internal walls .
Frequently asked questions about using a wall detector
Do I still need to worry about wiring safe zones if my wall detector shows nothing ?
Yes . Always treat recognised safe zones around sockets switches and similar accessories cautiously even if no live wire alert appears . Detection features are useful warnings ; they are not guarantees that every cable will be identified under every condition .
Can I use a wall detector on old Victorian or solid brick walls ?
Yes , although results may be less straightforward than on simple plasterboard partitions . Older properties often include mixed materials repairs redundant fixings deeper chases thick plaster layers or irregular backgrounds which means slower repeated scans are essential .
What is better : tapping the wall or using a scanner ?
A scanner is generally safer because tapping only gives rough clues about hollows or denser areas . By contrast , a proper wall detector provides more structured information about likely studs metal objects pipes or live wiring hazards . Even so , using both methods together can be sensible when planning fixings .
How many times should I scan before drilling ?
At least two passes from different directions is sensible ; more if readings conflict or if you are close to sockets plumbing routes kitchens bathrooms boiler feeds consumer unit routes or heavy duty fixing points . When uncertainty remains stop rather than guess .
Ready to drill safely with ScanStud?
Get Yours Now — £56.38